Introduction
Would you like to strengthen your hips and lower body without needing gym equipment? Looking for a beginner-friendly exercise that you can perform at home? Or perhaps you’ve heard about glute bridges but aren’t sure how to do them correctly.
If so, glute bridges are an excellent exercise to include in your routine.
Although the movement looks simple, glute bridges help strengthen the muscles around your hips while encouraging controlled movement and stability. They require little or no equipment and are suitable for many beginners who want to build strength gradually.
Glute bridges are commonly included in beginner strength programmes because they are easy to learn and can be modified to suit different fitness levels.
Whether you’re exercising at home, returning to exercise after a break or building your first strength routine, glute bridges can help you develop confidence with an important lower-body movement.
In this article, you’ll learn what glute bridges are, why they’re beneficial and how to perform them safely with proper technique.
If you’re just starting strength training, our article Bodyweight Exercises for Beginners: A Simple Guide to Building Strength Without Equipment provides a helpful introduction before learning individual exercises.
What Is a Glute Bridge?
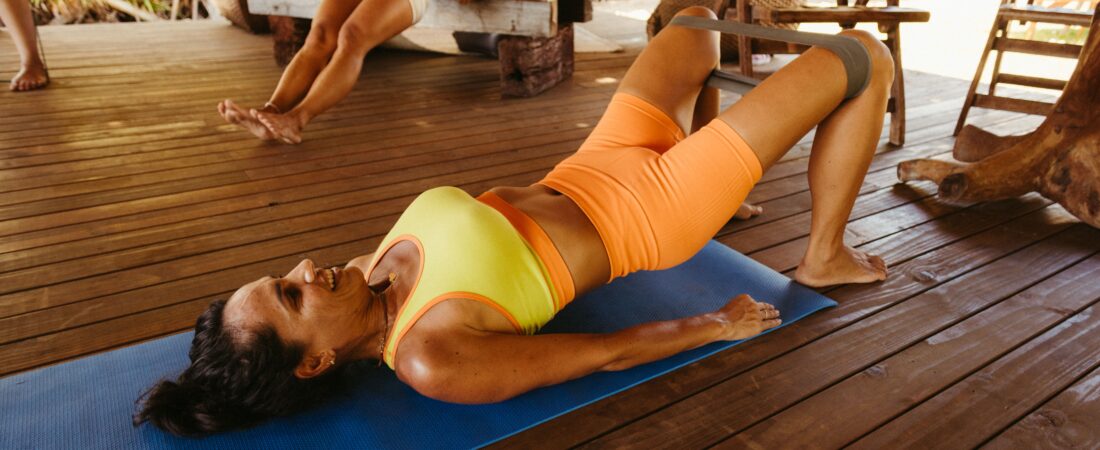
A glute bridge is a bodyweight exercise that involves lifting your hips off the floor while keeping your shoulders and feet in contact with the ground.
The movement is performed while lying on your back with your knees bent.
As you lift your hips, several muscles work together to raise and support your body before lowering back to the starting position.
Because the exercise is performed on the floor and requires no complicated equipment, it is an accessible option for many beginners.
It is often included in beginner home workouts because it helps develop strength while reinforcing controlled movement.
Benefits of Glute Bridges
1. Strengthen Your Hips and Glutes
Glute bridges primarily strengthen the muscles around your hips and buttocks.
These muscles contribute to many everyday movements, including standing up, climbing stairs and walking.
Developing strength in these areas can help create a solid foundation for future strength exercises.
2. Support Everyday Movement
Many daily activities involve extending your hips and maintaining lower-body stability.
For example, your hip muscles help when you:
- Stand up from a chair.
- Climb stairs.
- Walk uphill.
- Lift light objects from the floor.
- Change direction while walking.
Glute bridges allow beginners to practise this movement pattern in a simple and controlled environment.
3. Require Little or No Equipment
One of the biggest advantages of glute bridges is their convenience.
You don’t need:
- A gym membership.
- Weight machines.
- Dumbbells.
- Large workout spaces.
All you need is a comfortable space to lie down.
An exercise mat may make the movement more comfortable, but it isn’t essential.
4. Beginner-Friendly
Glute bridges are suitable for many beginners because they are easy to learn and can be modified if necessary.
You can focus on controlling the movement rather than lifting heavy weights.
As your confidence improves, you can gradually increase the challenge by changing the exercise variation or adding light resistance.
5. Complement Other Strength Exercises
Glute bridges work well alongside other beginner exercises such as bodyweight squats, lunges and resistance band exercises.
Including a variety of movement patterns helps create a balanced beginner strength routine.
Muscles Worked During Glute Bridges
Glute bridges involve several muscles working together throughout the movement.
These include muscles around your:
- Buttocks (glutes).
- Hips.
- Back of your thighs (hamstrings).
- Core.
Rather than isolating one muscle, glute bridges encourage these muscle groups to work together to produce and control the movement.
How to Do a Glute Bridge
Follow these simple steps to perform a glute bridge safely.
Step 1: Lie on Your Back
Lie comfortably on your back with your knees bent and your feet flat on the floor.
Place your feet approximately hip-width apart.
Rest your arms comfortably by your sides with your palms facing down.
Step 2: Find Your Starting Position
Position your feet so they are comfortably close to your hips.
Relax your shoulders and keep your head resting comfortably on the floor.
Gently tighten your stomach muscles while breathing normally.
Step 3: Press Through Your Feet
Press both feet into the floor evenly.
Begin lifting your hips by pushing through your heels while keeping the movement smooth and controlled.
Avoid using momentum to lift your body.
Step 4: Lift Your Hips
Continue lifting your hips until your body forms a comfortable straight line from your shoulders to your knees.
Pause briefly at the top of the movement without holding your breath.
Focus on maintaining control rather than lifting your hips as high as possible.
Step 5: Lower Your Hips Slowly
Slowly lower your hips back to the floor in a controlled manner.
Avoid dropping your hips quickly or relaxing completely before beginning the next repetition.
Maintaining control throughout the movement helps you practise good technique and keeps the exercise smooth.
Continue breathing naturally as you repeat the exercise.
Common Mistakes
Lifting the Hips Too High
Some beginners try to lift their hips as high as possible.
Instead, aim to raise your hips until your body forms a comfortable straight line from your shoulders to your knees.
Overextending your lower back isn’t necessary.
Pushing With Your Toes
Try to press evenly through your feet, particularly your heels, as you lift your hips.
This encourages a more stable movement pattern.
Holding Your Breath
It’s common for beginners to hold their breath during strength exercises.
Instead, breathe naturally throughout the movement.
For example, breathe out as you lift your hips and breathe in as you lower them.
Moving Too Quickly
Glute bridges should be performed slowly and with control.
Rushing the movement often reduces your ability to maintain good technique.
Easier and Harder Variations
One advantage of glute bridges is that they can easily be adjusted to match your fitness level.
Easier Variation
If lifting your hips feels challenging, begin by lifting only as far as feels comfortable.
You can also pause briefly between repetitions to reset your starting position.
Focus on learning the movement before increasing the difficulty.
Harder Variation
As your strength improves, you may increase the challenge by:
- Holding the bridge position for a few seconds.
- Performing additional repetitions.
- Placing a resistance band around your thighs.
- Progressing to a single-leg glute bridge.
There’s no need to rush these progressions.
Mastering the basic glute bridge first provides a strong foundation for more advanced variations.
How Often Should Beginners Do Glute Bridges?
For many beginners, performing glute bridges two to three times per week as part of a balanced strength routine is a sensible starting point.
Focus on performing each repetition with good control rather than completing a large number of repetitions.
As your confidence improves, you can gradually increase the repetitions or combine glute bridges with other beginner exercises such as squats, lunges and wall push-ups.
Remember, consistency is more important than intensity when you’re learning a new exercise.
Frequently Asked Questions
Are glute bridges good for beginners?
Yes.
Glute bridges are one of the most beginner-friendly lower-body exercises because they require little or no equipment and are relatively easy to learn.
What muscles do glute bridges work?
Glute bridges primarily strengthen the muscles around your buttocks and hips while also involving your hamstrings and core to help control the movement.
Do I need equipment?
No.
Glute bridges can be performed using only your body weight.
However, an exercise mat may make the exercise more comfortable, and a resistance band can be added later if you want a greater challenge.
Can I do glute bridges every day?
Some people include glute bridges in their daily movement routine, while others perform them several times each week as part of a strength programme.
Choose a schedule that allows you to recover comfortably while remaining consistent.
How many glute bridges should beginners do?
Start with a comfortable number of repetitions that allows you to maintain good technique.
As your strength improves, you can gradually increase the number of repetitions or try more challenging variations.
Conclusion
Glute bridges are a simple yet effective exercise for beginners who want to strengthen their hips and lower body.
They require little or no equipment, are easy to learn and fit well into almost any beginner home workout.
Remember, building strength doesn’t require complicated exercises.
Start with good technique, move with control and progress gradually as your confidence grows.
If you’re planning to make floor exercises a regular part of your routine, checkout choosing the best exercise mats for home workouts to help you find an option that’s comfortable and practical.
To continue building your beginner strength routine, explore our guides on Bodyweight Squats for Beginners, Wall Push-Ups for Beginners, Beginner Core Exercises and Resistance Band Exercises for Beginners.